Monday, February 27, 2012

Tobacco Sticks...

Used for hanging the tobacco in the barns to dry. 
They are quite long...45"- 50" and longer...
they can be a round stick or a square stick, with  pointed ends or cut ends...
they are a very hard wood.  I have to drill holes before putting in nails or screws.
And when cutting, a power saw is much easier than a hand saw.
Though they may not be used for hanging tobacco anymore, they do still have a number of uses...

A basket hanger...drill a hole on each end, add eye hooks and strips of homespun and hang to hooks in the ceiling...
this one  holds a few of my favorite baskets.
You could also use "S" hooks for hanging pans....just be sure the ceiling hooks are secured tightly enough that you don't run the risk of them coming out of the ceiling..

A tobacco stick ladder...this hangs in my kitchen and as you can see it is loaded with favorite kitchen tools,gadgets and knick knacks...I've thought about taking it down but I just haven't been able to do it yet. 
SO many interesting things! 
Tobacco stick star...I had this one hanging on my front porch...still wrapped with the lights, I just hung my wreath in the middle of it for this past Christmas. 
I  have cut the sticks into shorter lengths and made smaller stars, a more suitable size for hanging indoors.

These sticks have so many more uses...
Cut lengths of it, add some decorative nails or hooks for a peg rack or herb drying.
Use for making primitive frames...
...or even a curtain rod.
Look beyond an items  intended use and be creative.

Enjoy your day!

Wednesday, February 22, 2012

French Breakfast Puffs.....

So simple yet SO good! 
I was wanting a little somethin'  the other morning to go with my coffee, so
I started flipping through my The Pioneer Woman Cooks cookbook
and found this recipe..... OMGosh! 
It was quite the ordeal to get them made...as I started mixing the dry ingredients, I was at the end of my baking powder and when I got to the eggs, I had only one....so much for having a little somethin' with my coffee.....so they were put on hold until I got back from town...
so I had them with my afternoon coffee.....

FRENCH BREAKFAST PUFFS
3 cups flour
3 teaspoons baking powder
1 teaspoon salt
1/2 teaspoon ground nutmeg
1 cup sugar
2/3 cup shortening
2 eggs
1 cup milk

Coating:
2 sticks butter
1 1/2 cups sugar
3 teaspoons ground cinnamon

Preheat oven to 350 degrees.  Lightly grease 12 muffin cups.
In a large bowl stir together flour, baking powder, sal and nutmeg. Set aside.
In seperate large bowl, cream together sugar and shortening.  Add the eggs and mix again.
Alternate adding 1/3 of the flour mixture and 1/3 of the milk to the creamed mixture, beating well after each addition.
Fill muffin cups 2/3 full.
Bake 20 - 25 minutes, until golden.  Remove muffins from pan and set aside.

To make the coating, melt butter in bowl or glass pan.  In seperate container, combine sugar and cinnamon.
Dip warm muffins in the butter, coating thoroughly...then roll in the cinnamon sugar mixture.
*********************
She made a note that they freeze well and are great reheated...
Well, they were so good I knew there wasn't going to be any that would see the freezer but there were a few left for Sunday morning.....yep, she was right....they were just as delish reheated....
Hmm....I think I just might make up some more today!

***Note...I did use splenda for baking  in these and they were just as good! Also, for the coating, I started with just half the measurements and had plenty to give them all a generous coat.***

Enjoy!

Monday, February 20, 2012

Old Feeders...

There's no telling what you might find on the walls of my home.  As a print that I have hanging in my kitchen says...
"I LOVE ANTIQUES AND EVERYTHING OLD".... I do!
 They don't have to be huge furniture pieces that cost hundreds of dollars or fancy cut glass....
Just simple things that speak to me, telling me that they still have a purpose....
I call this 'new uses for old things'....I wish I had more photo's  to share with you as I'm sure there are others who have found new uses for these things.....
I think I found my first old feeder several years ago, buried in my folks old barn.  I took them home, scraped them off and cleaned them out and started using them as I would a shelf or a wall basket....


I'll be sharing more new uses over the coming weeks....and I'll try to get more photos.

Looks like a beautiful day out.....I'm solo today since there's no school for Presidents' Day, Rylee is home with mama.
I'm just kinda puttering around the house today....finishing up some laundry and taking the time to snap some photo's for future blogs and I think I might try to start something new in the sewing room.... hmm...I might even sneak in a little walk!

Enjoy your day!


Sunday, February 19, 2012

Grandma Mag...

I love old photographs.
This one is of my Great-Grandma Margaret (Zumwalt) Summers, aka Grandma Mag, with my Grandpa Summers and his sister, my Great Aunt Minnie (Summers) Meyers.
I never knew Grandma Mag nor Aunt Minnie.  Grandma Mag passed away in 1954, more than 10 years before I was born.  Minnie died on December 5, 1918 at the age of 21 and 8 months pregnant, from the flu. 
Grandpa turned 15 years old on that day. 
From what I understand, Grandma Mag was, as we would call it today no matter the circumstance,  a single mother.  Grandpa Charlie passed away when Grandpa was a youngster.  She  remarried but one day he just up and left, never to be heard from again.  I can't even remember his name and apparently Grandma Mag didn't want to remember, as she took back the Summers name.

According to my Great-Aunt Ruby, Grandma Mag was a skilled seamstress and what my Grandma Hazel learned about sewing, she learned  not from  her own mother, but from Grandma Mag once she and Grandpa were married.

I wish I had taken better notes as I was growing up and hearing some of the stories.....as people get older, memories start to fade and details are forgotten.  There are always old photographs but if someone doesn't record the who, what and when on the backs of them, the faces are unfamiliar to those who follow.
I'm trying to do better at recording the necessary information on the backs or with captions in scrapbook and photo albums. 
I'm hoping that as I blog more about my family, it will inspire and motivate me to get busy on my scrapbooking and record more information of generations past for our future generations.

It looks to be another beautiful day.....time to get ready to church.
I'll be making chicken enchiladas for Sunday supper....

Enjoy your day!

Friday, February 17, 2012

Finishes.....

After weeks and weeks, it's finally finished!
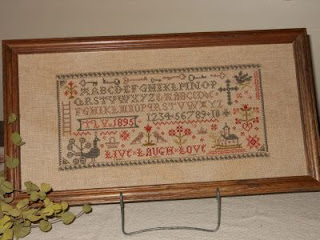
Live Laugh Love sampler...stitched by me, charted by Primitive Betty's 
I stitched this on a 32 ct Belfast Linen and usd the recommended dmc floss colors.
Before stitching, I gave the linen a bath in walnut ink crystals to age it just a bit.

These little cuties are child size half aprons that I made using remnants from previous projects. 
 They will be available for sale at Randolph Mercantile in the next couple days.

That's it for sewing room finishes today....will share more next week.

I hope you've been having a great week. 
We've had a mix of everything this week, from freezing  to snow to rain to sunshine and warmer temps.  It looks to be a nice day today as it was yesterday and days like that just make me all the more ready for spring.

Enjoy your day!

Wednesday, February 15, 2012

Mexican Chicken...

I made this a couple weeks ago.....
This recipe is from The Deen Family Cookbook....another of my favorite cookbooks.
Serve up with some rice....and some guacamole and chips on the side.
A quick and easy recipe!
JAMIE'S MEXICAN CHICKEN AND TORTILLA CASSEROLE
1 - 16 ounce jar salsa (2 cups)
1 cup chicken broth
1 - 7ounce bag tortilla chips
3 cups chopped cooked chicken
1 small onion, thinly sliced
3 cups (3/4 pound) grated monterey jack cheese (or pepperjack)
Preheat the oven to 375 degrees.  Combine the salsa and broth in a blender and process until smooth.  In a large bowl, toss the chips with 2 1/2 cups of the salsa mixture.  In a seperate bowl, toss the chicken with the remaining 1/2 cup salsa mixture.
In a greased 13" x 9" baking dish, layer one third of chips, followed by half of chicken, half of onion and only one third  of the cheese.  Repeat.  Top with the remaining chips and cheese.  Cover with foil and bake on the middle rack for 30 minutes or until heated through and cheese is melting.  Serve hot!

Friday, February 10, 2012

Finishes...

While sorting through some things in the sewing room,  I found this cute little number still laying in pieces, just waiting to be sewn together.  A child size half apron....made some remnants of previous projects. 
 Love them flowers!
And how cute are these......
.....made for a client's granddaughters. 
 I'll bet there's some cookie baking going on at her house this weekend!

So that's it from the sewing maching this week....besides alterations.
I'm also stitchin' away on the sampler and getting so  close to being done!  It's like reading a good book....
the closer you are to the end, the faster you read....and that's how I've been stitching.

Enjoy your day!


Wednesday, February 8, 2012

Cobbler.....

Mmm....I made this one with blueberries but you can use whatever fruit you'd like....I've made so many of these over the years but this time, I used the recipe from The Pioneer Woman's cookbook.  There's just a slight difference in the ingredients list.....
BLACKBERRY COBBLER
1 stick melted butter
1 1/4 cup plus 2 Tablespoons sugar
1 cup self-rising flour
1 cup milk
2 cups fresh or frozen blackberries (or blueberries, peaches, raspberries, etc...)
Preheat the oven to 350.  Butter a 3 quart baking dish.
Whisk together 1 cup of the sugar with flour and milk; whisk in the melted butter.
Rinse berries and pat dry.
Pour batter into baking dish.  Sprinkle berries evenly over the top of batter.
Sprinkle the 1/4 cup of sugar over berries.
Bake for an hour or until golden brown and bubbly.  When 10 minutes remain, sprinkle with remaining 2 tablespoons of sugar. 
Serve it by the spoonful with ice cream or whipped cream....or both!
****************
LAZY DAY COBBLER ( POORMAN COBBLER)
1 stick melted butter
1 cup sugar
1 cup flour
1 1/2 teaspoon baking powder
3/4 cup milk
1 can sliced peaches, drained(or fresh or frozen peaches, blueberries, blackberries, etc...)
Melt butter in baking pan.  Mix flour, sugar baking powder and milk.  Pour over butter.
Place peaches evenly over the top of batter.  Do not stir.
Bake at 350 for 30 minutes or until golden and bubbly.
Enjoy!

Sunday, February 5, 2012

Aunt Ruby.....

She was actually my great-aunt Ruby, a sister to my Grandma Hazel.
We had to say good-bye to her yesterday....
She was 96 years young and an awesome lady!
The past couple years, for her birthday, all she wanted was a motorcycle ride! 
She had never ridden one and that's what she wanted to do so that's what she got!
So besides den mother, basketball player & bowler......
.....she got to add "BIKER BABE" to her titles.
(You can't  see it, but that's what her t-shirt says)
She played cards and dominoes....and she didn't like to lose...especially when playing against Uncle Rex.
She continued to live in her own place after Uncle Rex passed and it wasn't until just a couple months ago that she had to give it up. 
Two of my sisters and I surprised her with a visit on her 95th birthday and that was the last time we got to see her.  I am SO glad we got that time with her, as we didn't get to see her very often since we lived 4 hours away.
She's right where she wants to be now....she is with Uncle Rex, and she's giving him the "what-for" in a game of dominoes.

Rest in peace Aunt Ruby....we love and miss you.

Friday, February 3, 2012

Finishes, Re-Do's & In Progress...

Well, according to Mr. Groundhog, we will be getting six more weeks of winter weather.  Hmm....I guess if it's the same kind of winter we've been getting so far, then bring it on! 

I shared these fabrics with you awhile back so I wanted to share the finished aprons with you....making progress in using up some of my fabric stash.....

 
These aprons are available for sale at Randolph Mercantile...$30 each(plus S&H). 
 If you are interested, just drop me an email.
These boxes were leftover from Christmas so rather than pack away, I decided to re-do them...I took off the ticking and replaced with a navy/burgundy/tan homespun, wrapped with the cheesecloth and added the old keys.  These can be used as a unique gift box, storing supplies in your work studio or simply as is.
These are also available... $14.95 plus S&H...again, just drop me an email.... jehess4@sbcglobal.net

We've all seen the cake stand or multi-tiered stands made out of cups and saucers or various items and I recently seen a photo of one that reminded me of this set of trays I bought awhile back at Hobby Lobby and these old spools that I had put in my "get rid of box"....I'm SO glad I hadn't gotten rid of them yet....I cut off the threads that was still wrapped on them,gave them a coat of black paint, sanded and stained.  I'll assemble this into a tiered stand and will be using it in my sewing room.
And  still in progress, my LIVE LAUGH LOVE sampler....it's gradually coming along.

Of course there are a few other works in progress, I'll share them with you later!

Enjoy your day!


Wednesday, February 1, 2012

Banana w/Chocolate Chip Muffins...

What can I say?  I like muffins!  While everyone else is into cupcakes and cake pops, I'm into muffins!  Tried these last night.....DEE-LISH right out of the oven....but still just as good this morning!

Banana w/Chocolate Chip Muffins
2 cups self-rising flour
1/2 teaspoon baking soda
1/2 cup sugar
1 cup chocolate chips
2 eggs
1/2 cup milk
1/4 cup melted butter
2 very ripe bananas, mashed (1 cup)

Preheat oven to 350.
Line regular sized muffin tin (12 count) with parchment liners.
In large mixing bowl, sift together flour & baking soda.  Stir in sugar and chocolate chips.
In small bowl, lightly beat the eggs, milk, melted butter and bananas.
Add all at once to the flour mixture and stir just til moistened.
Spoon batter into muffin cups.
Bake until golden brown or til toothpick inserted in center comes out clean....approximately 20 minutes.
Remove from oven, let cool 5 minutes then remove from tins.
************
I decreased the oven temp to 350 as the original recipe called for 400.  I also used splenda for baking rather than sugar.
When I buy bananas and it gets to the last one or two that get WAY ripe, I put them in the freezer for just this purpose....it makes for a super-moist muffin!
The original recipe actually called to split the chocolate chips, using half in the mix then sprinkly remaining half on top.  I also got 16 regular size muffins rather than 12.
************
Enjoy your day!